Firebase
Firebase is a fully managed platform for building iOS, Android and Web Applications that provide automatic data synchronization, authorization services, messaging, file storage, analytics and more
Add Firebase to your Application
Following are the two ways to add the Firebase to your application.
Using Firebase Assistant: – If you are using Android Studio version 2.2 or later, the firebase assistant is the simplest way to connect your app to firebase. To open the Firebase Assistant in Android Studio follow the steps below:
- Create the App: – Using Android Studio Create the new Android project with the specific name. Set the API level and the basic Activity for the project and click finish.
- Add Firebase to your Project: – Click on the Tools and then click on Firebase options in the drop-down menu.
- A menu will appear on the right side of the screen. It will show various services. Choose the desired services. Now Click on the connect to the firebase option.
- Now Add dependencies of your service by clicking on Add FCM to your app.
In this, you add Firebase.
Manually Adding Firebase: – To Add Firebase manually below are steps
- Go to the Firebase Website firebase.google.com
- Click on go to console (NOTE: Make sure that you’ve logged in your google account). Here it will show you the lists of previously created project. If you are a new user then it will just show Add Project. Create a new project by clicking on the Add project Button.
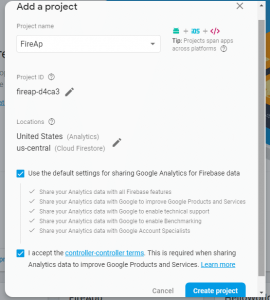
- Give the project name.. Firebase automatically assigns the project-ID. Accept the controller terms. This is required when sharing Analytics data to improve Google Products and Services. And click on Create project.

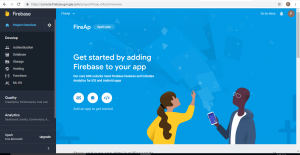
- In the next choose “Add Firebase to your Android app”.

- Then add the package name, nickname and the certificate SHA-1. Package Name – Your package name is generally the applicationID in your app-level build gradle file. App Nickname – It is optional. If specified, the app nickname it will be used throughout the firebase console to represent this app. Nickname isn’t visible to users. Certificate SHA-1 – This is also optional. To add certificate SHA-1, Go to your Android studio. Click on the gradle option from the right side. Select the root folder, click on task android and double click on the signing report. The process will start. Inside the run panel, you’ll get the certificate SHA-1. Click on register App.

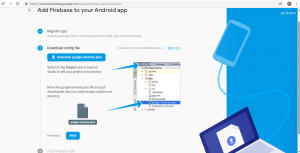
- This will download the google-services.json file. Move the google-services.json file you just downloaded into your Android app module root directory.

- Integrating into your Application: – Add the following gradle dependencies to your project-level build.gradle. “classpath ‘com.google.gms:google-services:4.0.1′”. Add the following dependencies gradle dependencies to your App-level build.gradle “implementation ‘com.google.firebase:firebase-core:16.0.1′” and “apply plugin: ‘com.google.gms.google-services'”.

- Sync your gradle. After you add the initialization code, run your app to send verification to the Firebase console that you’ve successfully installed Firebase. Finally click on finish.
Add Data in Database using Android Studio and Firebase
Following is the simple code to Add data in the database. For this Open Android Studio Create the project using the project name. Connect the database to your project. And create the following files.
activity_main.xml
<?xml version="1.0" encoding="utf-8"?>
<RelativeLayout xmlns:android="http://schemas.android.com/apk/res/android"
    xmlns:app="http://schemas.android.com/apk/res-auto"
    xmlns:tools="http://schemas.android.com/tools"
    android:layout_width="match_parent"
    android:layout_height="match_parent"
    tools:context=".MainActivity">


    <EditText
        android:id="@+id/editText2"
        android:layout_width="wrap_content"
        android:layout_height="wrap_content"
        android:layout_alignParentStart="true"
        android:layout_alignParentTop="true"
        android:layout_marginStart="84dp"
        android:layout_marginTop="123dp"
        android:autofillHints="@string/text"
        android:ems="10"
        android:hint="@string/text"
        android:inputType="textPersonName" />

    <Button
        android:id="@+id/button3"
        android:layout_width="141dp"
        android:layout_height="96dp"
        android:layout_alignParentStart="true"
        android:layout_alignParentTop="true"
        android:layout_marginStart="115dp"
        android:layout_marginTop="255dp"
        android:text="@string/Button" />

</RelativeLayout>
strings.xml
<resources>
    <string name="app_name">FireAp</string>
    <string name="text">Enter Name</string>
    <string name="Button">Save Data</string>
</resources>
MainActivity.java
package com.example.admin.fireap;

import android.support.v7.app.AppCompatActivity;
import android.os.Bundle;
import android.text.TextUtils;
import android.view.View;
import android.widget.Button;
import android.widget.EditText;
import android.widget.Toast;

import com.google.firebase.database.DatabaseReference;
import com.google.firebase.database.FirebaseDatabase;

public class MainActivity extends AppCompatActivity {
    EditText editText;
    Button btn;


    DatabaseReference databaseName;
    @Override
    protected void onCreate(Bundle savedInstanceState) {
        super.onCreate(savedInstanceState);
        setContentView(R.layout.activity_main);

        databaseName=FirebaseDatabase.getInstance().getReference("name");


        editText=(EditText)findViewById(R.id.editText2);
        btn=(Button)findViewById(R.id.button3);


        btn.setOnClickListener(new View.OnClickListener() {
            @Override
            public void onClick(View v) {
                add();
            }
        });
    }
    private void add()
    {
        String name=editText.getText().toString().trim();
        if(!TextUtils.isEmpty(name))
        {
            String id=databaseName.push().getKey();
            Name na=new Name(id,name);
            databaseName.child(id).setValue(na);
            Toast.makeText(this,"Added Successfully", Toast.LENGTH_LONG).show();

        }
        else
        {
            Toast.makeText(this,"You should enter name",Toast.LENGTH_LONG).show();
        }
    }
}
Name.java
package com.example.admin.fireap;

public class Name {
    String ID;
    String name;

    public Name()
    {

    }

    public Name(String ID, String name) {
        this.ID = ID;
        this.name=name;
    }

    public String getID() {
        return ID;
    }

    public String getName() {
        return name;
    }
}


